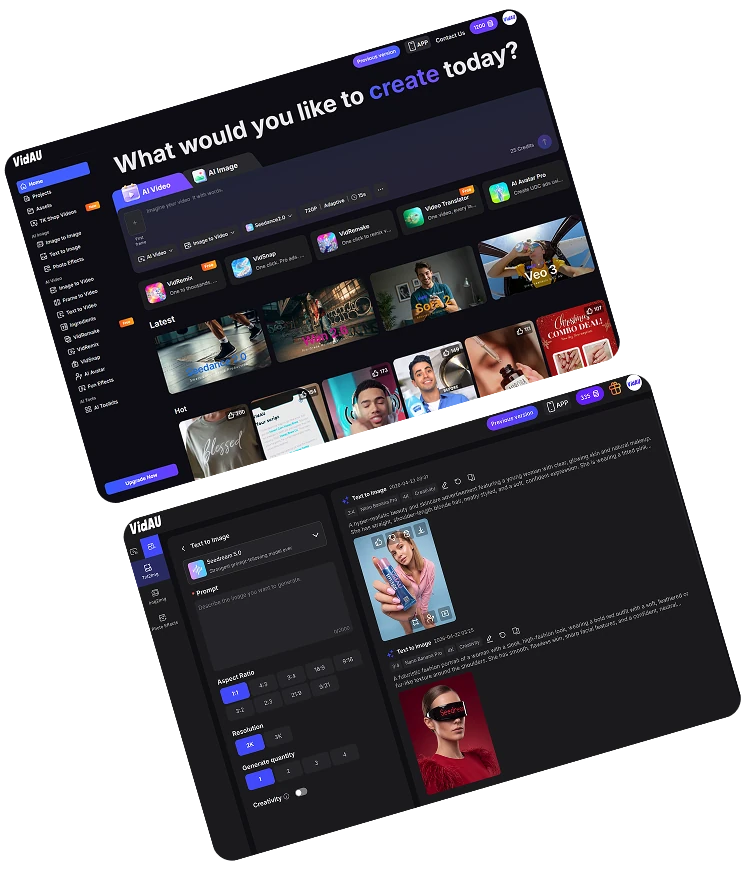


SEO, GEO Agent
Google is just the start.
Search has changed. Optimises for Google, ChatGPT, Perplexity, and Gemini, every place your customers search for answers.
Powered by VidAU, Veo 3, Seedance & More
SEO, GEO Agent
Google is just the start.
Search has changed. Optimises for Google, ChatGPT, Perplexity, and Gemini, every place your customers search for answers.
Ad Creative Agent
Stop briefing designers.
Writes the copy, builds the video, launches your campaign across Google, Meta, and TikTok, then shifts budget toward whatever is converting.

Meta Ads Agent
Meta Ads that actually close.
Grow your audiences, write the copy, design the creatives, launch your campaigns across Facebook and Instagram, then optimize spend toward whatever is converting, automatically.

TikTok Ads Agent
TikTok ads, handled end to end.
Plans creative, launches campaigns, and optimises targeting and budget, your TikTok performance on autopilot.
Extraordinary Awards
Best AI Tool for Ad Creatives
Product Hunt
#1 Product of the Month
$350,000
Google Cloud Startup Program Grant
Trusted by brands and creators worldwide


Awards: Best AI Tool for Ad Creative, Extraordinary Awards 2025; #1 Product of the Month, Product Hunt, September 2025; Google Cloud Startup Program Grant, $350,000
Powered exclusively by: Sora 2 (OpenAI)

Powered by VidAU

Powered by: Veo 3 · Nano Banana · Sora 2

Powered by: Veo 3 · Sora 2 · Seedance 1.0 · Hailuo 2.3 · Kling 2.5 · Vidu AI · Wan AI · PixVerse V5 · VidAU
Powered by: Veo 3 · Nano Banana · Sora 2
Powered by: Nano Banana 2 · Nano Banana Pro · Nano Banana · VidAU Image V1.5

Powered by: Veo 3 · Sora 2 · Seedance 1.0 · Hailuo 2.3 · Kling 2.5 · Vidu AI · Wan AI · PixVerse V5 · VidAU


Google DeepMind · Cinematic Realism · Native Audio

OpenAI · Narrative Structure · Viral Cloning

ByteDance · Product Precision · Smooth Motion

MiniMax · Long-Form · Budget Performance

Kuaishou · Object Accuracy · Human Motion

Aesthetic Range · Consistent Characters

Fluid Motion · Lifestyle Content · Natural scenes

Bold Creative · Multi-Style

Proprietary · Ad Performance · Commercial Optimised

Google DeepMind · Cinematic Realism · Native Audio
OpenAI · Narrative Structure · Viral Cloning
ByteDance · Product Precision · Smooth Motion
MiniMax · Long-Form · Budget Performance
Kuaishou · Object Accuracy · Human Motion
Aesthetic Range · Consistent Characters
Fluid Motion · Lifestyle Content · Natural scenes
Bold Creative · Multi-Style
Proprietary · Ad Performance · Commercial Optimised
ByteDance · Deep Thinking · Real-Time Search

Maximum Prompt Accuracy

Proprietary · Commercial Campaigns · Ad-Ready

ByteDance · Deep Thinking · Real-Time Search
Maximum Prompt Accuracy
Proprietary · Commercial Campaigns · Ad-Ready
ByteDance · Deep Thinking · Real-Time Search
Maximum Prompt Accuracy
Proprietary · Commercial Campaigns · Ad-Ready
ByteDance · Deep Thinking · Real-Time Search
Maximum Prompt Accuracy
Proprietary · Commercial Campaigns · Ad-Ready
ByteDance · Deep Thinking · Real-Time Search
Maximum Prompt Accuracy
Proprietary · Commercial Campaigns · Ad-Ready
ByteDance · Deep Thinking · Real-Time Search
Maximum Prompt Accuracy
Proprietary · Commercial Campaigns · Ad-Ready
ByteDance · Deep Thinking · Real-Time Search
Maximum Prompt Accuracy
Proprietary · Commercial Campaigns · Ad-Ready
ByteDance · Deep Thinking · Real-Time Search
Maximum Prompt Accuracy
Proprietary · Commercial Campaigns · Ad-Ready
ByteDance · Deep Thinking · Real-Time Search
Maximum Prompt Accuracy
Proprietary · Commercial Campaigns · Ad-Ready
AFFILIATE MARKETERS

Test 10 products before your competitor briefs one. Paste a link, get a finished ad, find your winning ad before the trend dies.
DROPSHIPPERS

New product every day. New ad every day. VidAU turns any supplier link into a scroll-stopping video ad, before the market moves.
ECOMMERCE & DTC BRANDS

Turn your Shopify, Etsy, etc. link into a cinematic video ad, scenes, captions, voiceover, and CTA in minutes. No shoot. No agency.
PERFORMANCE MARKETERS

More creatives. More data. Better ROAS. Generate 100+ variations weekly, different hooks, formats, angles.
MEDIA BUYERS

Keep your campaigns fed with fresh creative every week. No briefs. No back-and-forth. No production delays are holding up your spend.
SOCIAL MEDIA CREATORS

One piece of content. A week of platform-native posts. No filming. No editing. No camera required.
UGC CREATORS

Generate lifelike UGC-style ads on demand. No studio. No hiring talent. 40+ avatars, 49+ languages, ready in minutes.
CREATIVE AGENCIES

Production studio output. Zero overhead. First-draft speed. Final output quality. No new hires.
SAAS & APP MARKETERS

Describe your product. VidSnap builds a launch-ready app ad, hooks, captions, CTA, no prompt expertise needed.
SMALL BUSINESS OWNERS

Studio-quality ads without the studio price. No team. No editor. Just your product and VidAU.
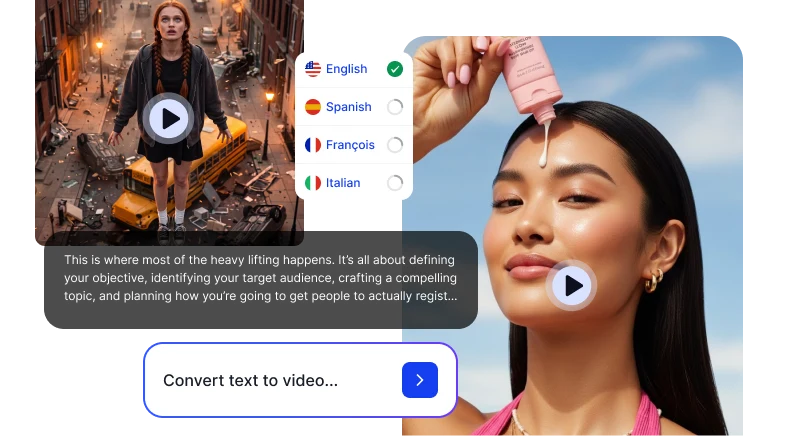
GLOBAL & MULTILINGUAL

Brands 49+ languages. Native lip-sync. One ad, every market, no translation agency, no reshoots.


Free to start · No editing skills needed · Commercial-ready output · Cancel anytime