GEMINI 3.0 + Google AI VEO 3 Review: Google Just Shocked Everyone

Want to put yourself in any AI video, wear different outfits, or hold any product you can imagine? Now you can! This Google AI VEO 3 Review guide breaks down how to use AI video generators such as Nano Banana and VEO 3 to create amazing AI videos featuring yourself, even if you’re new to this.
Key Takeaways
- Combine Tools: Use Nano Banana to create your AI character and VEO 3 to bring it to life in videos.
- Image Prep is Key: Start with a clear photo of yourself with a plain background.
- Get Creative with Prompts: Use AI tools like ChatGPT to describe scenes and generate unique video ideas.
- Aspect Ratio Matters: Ensure your images match the desired video format.
- Refine in Editing: Use video editing software to polish your final AI creations.
Getting Started with Nano Banana

To begin video generation, you’ll need to access Nano Banana. You can find it through Google AI Studio by searching for “Google AI Studio Nano Banana.” The first link that appears, usually titled “Gemini 2.5 Flash / Image Nano Banana,” will take you directly there.
Alternatively, for free image generation, you can use lmarena.ai. If you run out of credits on Google AI Studio, LM Arena is a great backup. You can even get around its limits by opening a new tab or using private browsing mode for more generations.
Preparing Your Image
Before you start generating, you need a good image of yourself. Make sure the background isn’t too busy. A simple background, like a plain wall, works best. You can even use Nano Banana to change your background to green or white if needed. Just upload your photo and specify the background color you want, keeping everything else the same.
How To Prepare Your Image
Also, think about the type of video you want to create. If you’re aiming for a portrait video, upload a portrait-oriented image. For landscape videos, use a landscape image. Nano Banana uses the aspect ratio of the image you upload. If you only use a text prompt, it defaults to a 1:1 (square) aspect ratio, so uploading your image in the desired format is the easiest way to control this.
Image Prep Checklist
- Choose a simple, plain background.
- Match image orientation to your target video ratio.
- Use Nano Banana to swap backgrounds if needed.
- Keep face centered and well-lit.
Finding Viral Scene Ideas

Where do you get ideas for your AI videos? Two great places are:
- Tragity: Search for “viral scene ideas” on Tragity. You’ll get a bunch of suggestions, and you can pick and choose what works for you.
- Pinterest: Search for any concept you have in mind, like “skydiving” or “person in a forest.” Pinterest offers a wide range of visual inspiration.
Once you find an image that sparks an idea, save it. You can then use ChatGPT to describe this image and turn it into an image prompt. For example, you can ask it to “describe this image to an image prompt.” If the description isn’t quite right, you can easily ask ChatGPT to change details, like making the subject a man instead of a woman.
Prompt boosters
- “Keep the image sharp and clearly visible.”
- “Keep the facial features exactly the same.”
- “Hands visible, fingers natural, realistic lighting.”
- “Cinematic depth of field, natural skin texture.”
Generating Your AI Character
Now to AI characters, take the prompt generated by ChatGPT and use it in Google AI Studio with your prepared image. A key tip for getting sharp, clear images is to add specific phrases to your prompt, such as “Keep the man’s facial features exactly the same, unchanged, sharp, and clearly visible.” Also, add “Keep the image sharp and clearly visible” to the end of your prompt whenever you generate an image. This helps avoid grainy or blurry results.
After generating an image, it’s a good idea to download it and re-upload it for a closer shot. This helps refine the details. You’ll repeat this process to create various scenes, like yourself sitting in the woods or on a campsite.
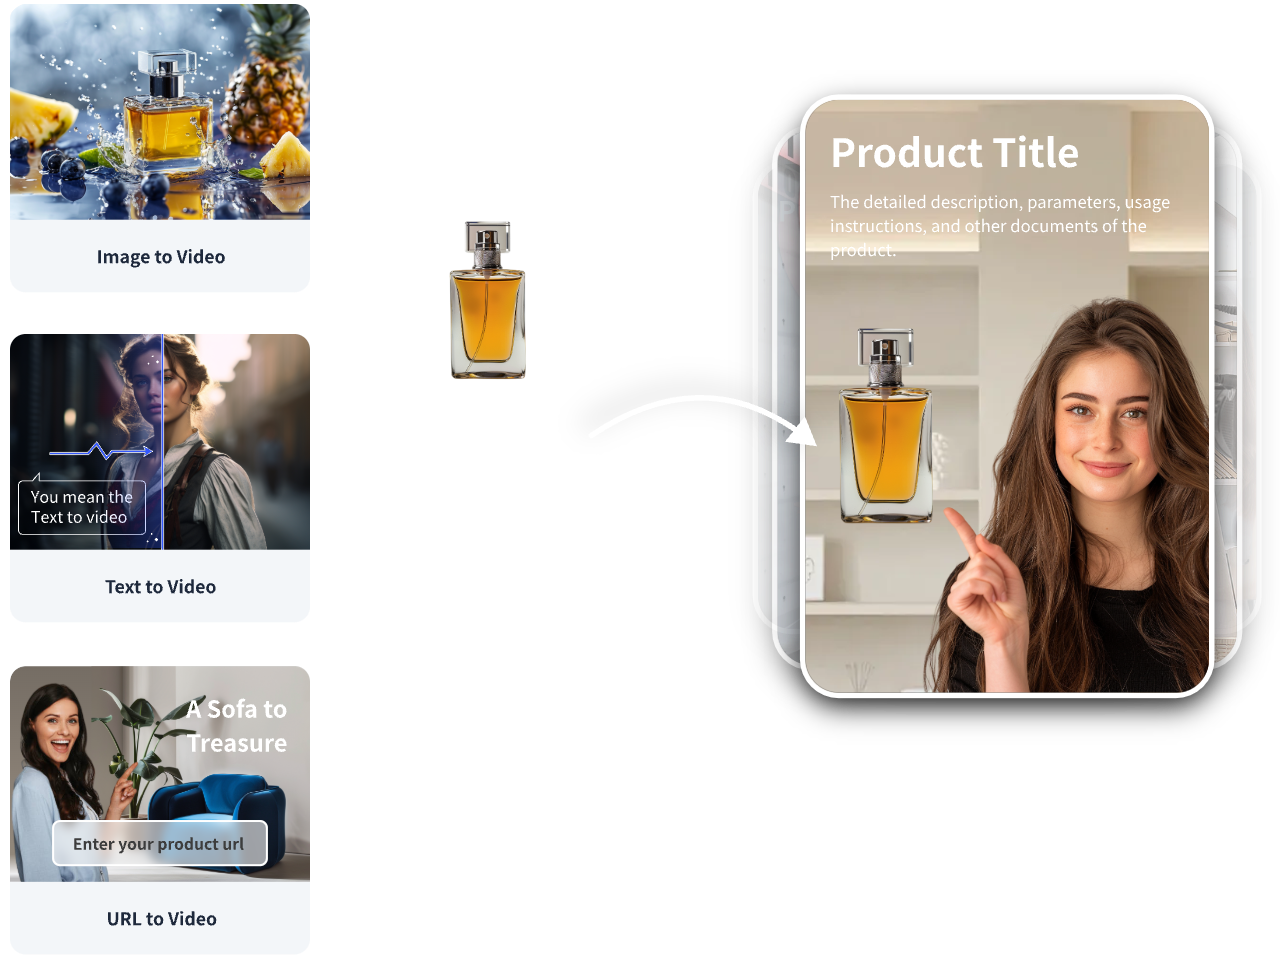
Holding Products in AI Videos
Putting yourself in a scene holding a product can be tricky. Here’s a two-step approach:
- Create the Base Image: Generate an image of yourself in the desired pose without the product.
- Add the Product: Download the image from step one. Then, upload both your AI generated image and the product image into Nano Banana. Use a prompt that describes you holding the product.
Important Note on Aspect Ratio: When uploading multiple images, Nano Banana uses the aspect ratio of the last uploaded image. To maintain your desired aspect ratio (e.g., 16:9), make sure the image with that aspect ratio is uploaded last.
Bringing Your AI Character to Life with VEO 3
Once you have your set of AI-generated images, it’s time to use VEO 3.
- Select VEO 3 Quality: In VEO 3, make sure you’re using “V3 Quality” instead of “V2 Fast” for better results, especially when converting images to video.
- Set Aspect Ratio: Adjust the aspect ratio to match your images (e.g., 16:9).
- Upload Image and Prompt: Upload one of your generated images. Then, write a simple prompt describing the action. For example, “Man skydiving” or “Man sitting cross-legged in the woods.” You can also specify accents, like “Nigerian accent,” though VEO 3 might not always get African accents perfectly.
- Generate Video: Click generate, and VEO 3 will create a video clip of your AI character.
Tip for Dialogue: When you want your character to speak, start the prompt with a generic action, like “He leans toward the camera and then says…” This helps VEO 3 capture the dialogue more accurately from the beginning.
VEO 3 quick settings
- Use V3 Quality for image-to-video.
- Start prompts with a small action.
- Keep dialogue short and clear.
- Match aspect ratio to your source image.
Final Touches
After generating all your video clips in VEO 3, you’ll want to edit them. Use a video editing tool like CapCut to:
- Arrange the clips in order.
- Cut out any unnecessary or awkward parts.
- Add sound effects and background music.
- Incorporate text or transitions.
This final editing step will make your AI videos polished and professional.
Common mistakes to avoid
- Uploading the wrong last image when using multiple inputs (aspect ratio shifts).
- Asking VEO 3 for long dialogue in one go (start with an action first).
- Skipping final audio cleanup and captions.
Comparison Table
| Feature | Nano Banana | VEO 3 | VidAU AI |
|---|---|---|---|
| Primary purpose | Generate consistent character images (your face, outfits, poses) | Turn still images into short videos (image-to-video) | Edit, brand, caption, resize, and export |
| Typical inputs | Photo of you; prompt text; optional product image | One image + action/dialogue prompt; chosen aspect ratio | VEO 3 clips; brand kit; overlay text/logos |
| Key outputs | High-quality still images with controlled look | Short animated clips with motion/lip movement | Captioned, on-brand videos in 9:16, 1:1, 16:9 |
| Strengths | Face consistency, prompt control, background swaps | Fast animation, simple prompts, V3 Quality clarity | Auto-captions, smart resize, templates, batch export |
| Limitations | Needs careful prompts; last image sets aspect ratio | Long dialogue can drift; accent accuracy varies | Not an image/motion generator (finishing tool) |
| Best step in workflow | Start — create base images & product poses | Middle — animate scenes into clips | Final — polish, brand, and deliver |
| What to do next in VidAU | Send best images to VEO 3 for motion, then finish in VidAU | Export clips → VidAU for captions, branding, resizing | Apply template, overlays, clean audio, resize, export |
Conclusion
This google ai veo 3 review shows a simple path: generate with Nano Banana, animate with VEO 3, and finish with VidAU AI. The tools fit together. The steps are short. The outputs are ready for every platform. Create, polish, and publish—fast.
Frequently Asked Questions
1. Is Veo 3 available in Gemini?
Now available in paid preview through the Gemini API, Veo 3.1 delivers enhanced realism, better prompt adherence, and richer native audio and dialogue.
2. How much does Google Veo 3 cost?
Google Veo 3 pricing depends on how it’s accessed: through a subscription like Google AI Ultra for $249/month (or a promotional rate) for full access, or through a pay-per-use model via the Gemini API for $0.40 per second.
3. Can I use Gemini AI for free?
Yes, you can use Gemini AI for free for basic and everyday tasks, such as using the Gemini app for help with writing, planning, and general questions.
4. Are there any usage or licensing concerns?
Avoid logos and trademarked products unless you have rights. Do not use other people’s faces without permission.
5. What’s the best way to add a product to my hand?
First generate the base pose without the product. Then upload that image plus the product image and prompt “holding [product] naturally, fingers visible.


