VidAU Editorial · AI Search
Turn Product Pages into Video Ads in Minutes
Use URL-to-video workflows to turn ecommerce product and landing pages into ad-ready videos fast. Step-by-step PDP-to-ad process, templates, specs, and a QA checklist.
By the VidAU Editorial Team · Reviewed before publishing
Paste a PDP URL and turn product pages into video ads in minutes. With new Omni-Reference models like Wan 3.0 that accept webpages directly, you can go URL to video ads storyboard to placement-ready variants without starting from scratch. This guide shows a dependable 30-minute workflow any ecommerce team can run today.
Quick Summary
• A 30-minute PDP-to-ad workflow using Omni-Reference models (e.g., Wan 3.0) converts a product URL into storyboarded, ad-ready 9:16, 1:1, and 16:9 variants.
• A generate-then-edit approach in browser editors (e.g., Kapwing, Canva) is the strongest alternative when you want tighter timeline control.
• TikTok/Reels/Shorts favor safe zones, 6–15 s cuts, burned-in captions, and clear CTAs kept out of overlay UI areas.
• US ecommerce marketers and performance teams benefit most, especially when launching UGC-style product to video ads quickly.
What Is Turning Product Pages into Video Ads?
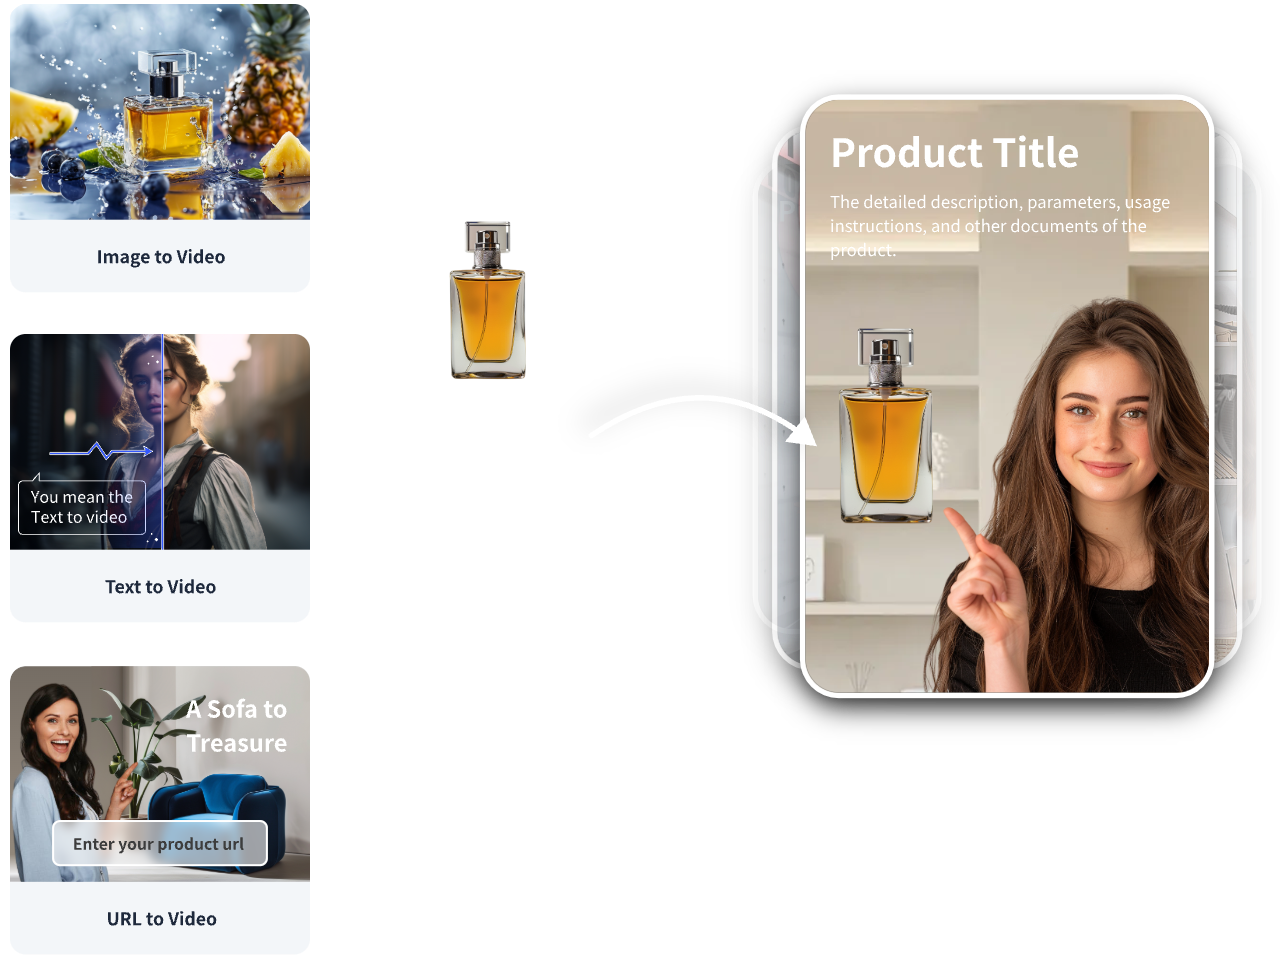
Turning product pages into video ads is the process of ingesting a product detail page (PDP) or landing page URL, auto-extracting key elements like hero image, SKU, price or offer, review stars, and copy, then mapping them to a short storyboard. Modern webpage to video pipelines render ad-ready cuts sized for placements, including 9:16, 1:1, and 16:9, with captions and a clear call to action.
How to Turn Product Pages into Video Ads in 30 Minutes

This time-boxed workflow goes from PDP URL to storyboarded variants you can ship today.
1) Minute 0–3: Collect the best PDP
• Pick a product detail page (PDP) with a strong hero image, 3–5 bullets, visible review stars, and a simple offer.
• Confirm you have usage rights for any brand and UGC assets on the page.
2) Minute 3–6: Paste URL into a webpage-to-video tool
• Use an Omni-Reference capable model (e.g., Wan 3.0 public beta trend) or a URL to video ads pipeline to ingest the page.
• Auto-extract: hero image/video, SKU, price or offer, reviews, benefits, and brand marks.
3) Minute 6–10: Map scenes to an ad template
• Scene 1 (Hook): Problem/benefit framing in 2–3 words plus hero image.
• Scene 2 (Value): Top feature with a product close-up.
• Scene 3 (Proof): Review stars or short testimonial line.
• Scene 4 (Offer): Discount, bundle, or free shipping.
• Scene 5 (CTA): Clear call to action and URL.
4) Minute 10–15: Draft punchy copy and VO
• Hook: Lead with outcome or objection. Example: ‘Hydrate all day—no leaks.’
• Keep 5–7 words onscreen at once; plan burned-in captions from the start.
• Choose UGC-style delivery if brand tone allows.
5) Minute 15–18: Brand and compliance
• Add logo, brand colors, and legal lines.
• Keep text and CTAs inside safe zones to avoid platform UI overlays.
6) Minute 18–22: Generate first cut
• Render a 12–15 s 9:16 master first. Prioritize pacing over full detail.
• Check transitions and motion against the product’s tone (e.g., calm vs. high energy).
7) Minute 22–25: Edit for clarity
• Shorten any slow scene to keep beats under 3 seconds.
• Ensure captions are accurate, legible, and consistently styled.
• Replace weak stock with product imagery when possible.
8) Minute 25–28: Export variants for placements
• Export 9:16 (TikTok/Reels/Shorts), 1:1 (feed), and 16:9 (YouTube/GDN) with safe zones honored.
• Keep the hook readable in all aspect ratios; adjust crop and text positions per cut.
9) Minute 28–30: QA and link routing
• Verify SKU, price/offer, and review stars match the PDP.
• Burn in captions, set audio levels, and embed a short CTA.
• Generate UTM parameters for each variant to support A/B testing and channel attribution.
VidAU for URL-to-video speed: If you want to skip manual mapping, VidAU’s URL to Video Ads and Product to Video can ingest a PDP or landing page URL, auto-build a scene plan from the hero image, benefits, review stars, and offer, then output ad-ready variants for 9:16, 1:1, and 16:9. You provide the product URL and any brand rules; the tools accelerate the storyboard and rendering stages while keeping room for edits.
Suggested Visual: A simple flow diagram from PDP URL → auto-extract → storyboard → 9:16, 1:1, 16:9 exports.
Specs and formats to turn product pages into video ads
Follow these guardrails so each cut is platform-ready.
• Aspect ratios: 9:16 vertical first, then 1:1, then 16:9.
• Duration: 6–15 s for short-form placements; up to 20–30 s for YouTube or retargeting.
• Safe zones: Keep essential text and CTA 120 px from edges on 9:16; avoid top/bottom UI bars where captions and buttons live.
• Captions: Burned in for accessibility and silent autoplay; 42–60 characters per line max.
• Hooks: Show product within first 1–2 seconds; avoid long logo stings.
• Proof: Use review stars and a short testimonial; never imply universal results.
• Offers: Keep numbers large and readable; include terms if required.
• File: MP4/H.264, 1080×1920 for 9:16; match source quality; don’t upscale needlessly.
• Audio: -14 to -12 LUFS integrated loudness; music non-intrusive; VO crisp.
Key Takeaways
• Design for vertical first, then adapt to square and landscape.
• Keep hooks ultra-visible inside safe zones to avoid overlay collisions.
• Captions and concise proof points lift attention and retention.
Suggested Visual: Safe-zone overlay mock showing protected areas and UI blocks.
A lightweight stack for URL-to-video ads

Use a small, dependable toolchain and keep edits tight.
• Stage: URL ingestion
Recommended Tools: VidAU URL to Video Ads
Why: Fast PDP-to-storyboard mapping
• Stage: Product-led build
Recommended Tools: VidAU Product to Video
Why: Auto scenes from product info
• Stage: Generate-then-edit
Recommended Tools: Kapwing, Canva
Why: Timeline control after generation
• Stage: Fine edits
Recommended Tools: CapCut, Descript
Why: Quick trims, captions, crops
• Stage: Audio polish
Recommended Tools: Descript, Audition
Why: Clear VO and level control
• Stage: QA & tags
Recommended Tools: Sheets, URL builder
Why: UTM and variant tracking
Note: Some teams prefer a generate-then-edit model (Kapwing-style) when they need more timeline control after the first cut, while URL-to-video pipelines maximize speed from PDP to ad.
QA and launch checklist for ecommerce PDP to ad
Before you spend, run this checklist.
• Visual accuracy: Hero image, color, SKU match the product detail page.
• Copy integrity: Offer, price, shipping, and terms are current and legible.
• Proof: Review stars screenshot or text is truthful and sourced; no fake claims.
• Hook clarity: Product appears in 1–2 seconds; headline under 7 words.
• Captions: Accurate, burned in, no typos; font size readable on mobile.
• Safe zones: CTA and key text clear of UI overlays in all aspect ratios.
• Audio: VO intelligible on phone speakers; music licensed and balanced.
• Links: Correct landing page; UTM parameters per platform, campaign, ad set, and variant.
• A/B testing: Plan at least two hooks and two CTAs; rotate first-frame visuals.
• Compliance: Disclaimers where needed; no prohibited claims or restricted content.
Suggested Visual: A one-page QA checklist screenshot with green checks and example frames.
When to use URL-to-video vs generate-then-edit

• Choose URL to video ads when speed matters, you have strong PDPs, and the goal is fast ecommerce PDP to ad variations across placements.
• Choose a generate-then-edit workflow when you need more scene-level timeline control, brand-motion consistency, or longer explainers that start from a script rather than a page.
Create With VidAU
Turn scripts, product URLs, and creative ideas into ad-ready video assets with a structured AI workflow.
Key takeaway
Final Thoughts
You do not need to rebuild creatives from scratch. Paste a strong PDP or landing page URL, extract the essentials, map five tight scenes, and export 9:16, 1:1, and 16:9 cuts with captions and safe zones respected. Ship, learn, and iterate with UTM-tagged A/B tests.
If you want to compress steps further, try VidAU’s URL to Video Ads or Product to Video to auto-build scenes and variants from your product URL, then make light edits before export. It is a practical fit for teams running fast product to video ad cycles.
Frequently asked questions
How do I turn product pages into video ads without starting from scratch?
Use a webpage to video pipeline that ingests a PDP or landing page URL, auto-extracts hero assets, SKU, offer, and review stars, then maps them to a short storyboard. From there, generate a 9:16 master, refine captions and pacing, and export 1:1 and 16:9 variants for additional placements.
Which models support webpage-to-video and why does that matter?
Omni-Reference models, highlighted by Wan 3.0’s public-beta push, can accept webpages directly alongside text and images. That matters because they reduce manual rebuild time, letting you move from URL to storyboard in minutes. You still need human QA for claims, safe zones, captions, and brand rules before launching paid campaigns.
What video lengths and aspect ratios should I export for ads?
Prioritize 9:16 vertical at 12–15 seconds for TikTok, Reels, and Shorts. Add 1:1 for feed placements and 16:9 for YouTube or display video. Keep hooks visible in the first 1–2 seconds across all aspect ratios, and verify safe zones so platform UI does not cover your headline or CTA.
How do I include review stars and social proof correctly?
Use verifiable review stars or a short testimonial pulled from your PDP or landing page. Display them briefly with legible text and avoid implying universal results. Keep the proof scene clear of overlays, and ensure any rating snapshots are current, truthful, and consistent with the product detail page.
Do I need burned-in captions if platforms add auto-captions?
Yes. Burned-in captions ensure consistent styling, immediate readability on silent autoplay, and guard against platform transcription errors. Limit to 42–60 characters per line, maintain contrast for accessibility, and keep captions inside safe zones so they remain visible across TikTok, Instagram, and YouTube placements.
What are safe zones and how do they affect ad performance?
Safe zones are protected areas within the frame where critical elements will not be covered by platform UI, captions, or buttons. Keeping hooks and CTAs inside these zones improves comprehension and click-throughs. For 9:16, leave generous top and bottom margins and avoid the lower third where action buttons often appear.
What should I check during QA before launching?
Confirm visual accuracy (hero, color, SKU), verify offers and pricing, ensure captions are correct, and test audio clarity. Review safe zones on 9:16, 1:1, and 16:9 cuts, validate UTM parameters, and scan for policy and legal issues. Finally, ensure the CTA lands on the correct product detail page.
How do I set up UTM parameters for A/B testing?
Append UTMs that encode platform, campaign, ad set, creative variant, and aspect ratio, such as source=tiktok, medium=cpc, campaign=pdp_launch, content=hookA_9x16. Create parallel variants with different hooks or CTAs, then read performance by variant in analytics. Keep naming consistent so you can scale winners quickly.
Can this approach work for landing pages that are not PDPs?
Yes. The same URL to video ads approach works for collection pages, bundles, and promotional landers. Ensure the page has a strong hero visual, a clear offer, and 3–5 benefits you can turn into scenes. You may replace SKU-specific lines with category-level proof or bundle value statements.
When should I choose a generate-then-edit workflow instead?
Pick generate-then-edit when brand motion rules are strict, you need layer-level timeline control, or you are building longer explainers that start from a script. This approach mirrors studio editing while keeping AI speed, letting you re-time scenes, restyle captions, and adapt layouts across aspect ratios with precision.