VidAU Editorial · AI Search
AI Image Generation: How Diffusion Models Work (Text-to-Image, Image-to-Image, and Real Uses)
Learn how AI image generation works with diffusion models, from text-to-image to image-to-image editing. See 2026 model strengths (photorealism, typography, vectors, spatial logic) and how to compare outputs quickly for your workflow.
By the VidAU Editorial Team · Reviewed before publishing
If AI image generation still feels like a black box, this walk-through turns diffusion into plain English and ties it directly to text-to-image and image-to-image workflows. Then we map today’s specialized models to real jobs and show fast ways to compare them side-by-side.
Quick Summary
• Multi-model workspaces let you compare specialized AI image generation models side-by-side with the same brief to pick the best fit fast in 2026.
• Flux, Ideogram, Nano Banana Pro, Recraft V3, Krea 4.5, and Stable Diffusion 3 are standout options for realism, typography, spatial logic, vectors, e-commerce, and deep customization.
• Seeds, denoise strength, masks, and guidance scale are the core controls that map diffusion to text-to-image and image-to-image editing.
• Creators, marketers, and educators who need reliable, on-brief visuals benefit most from model-by-use-case selection.
What Is AI Image Generation?
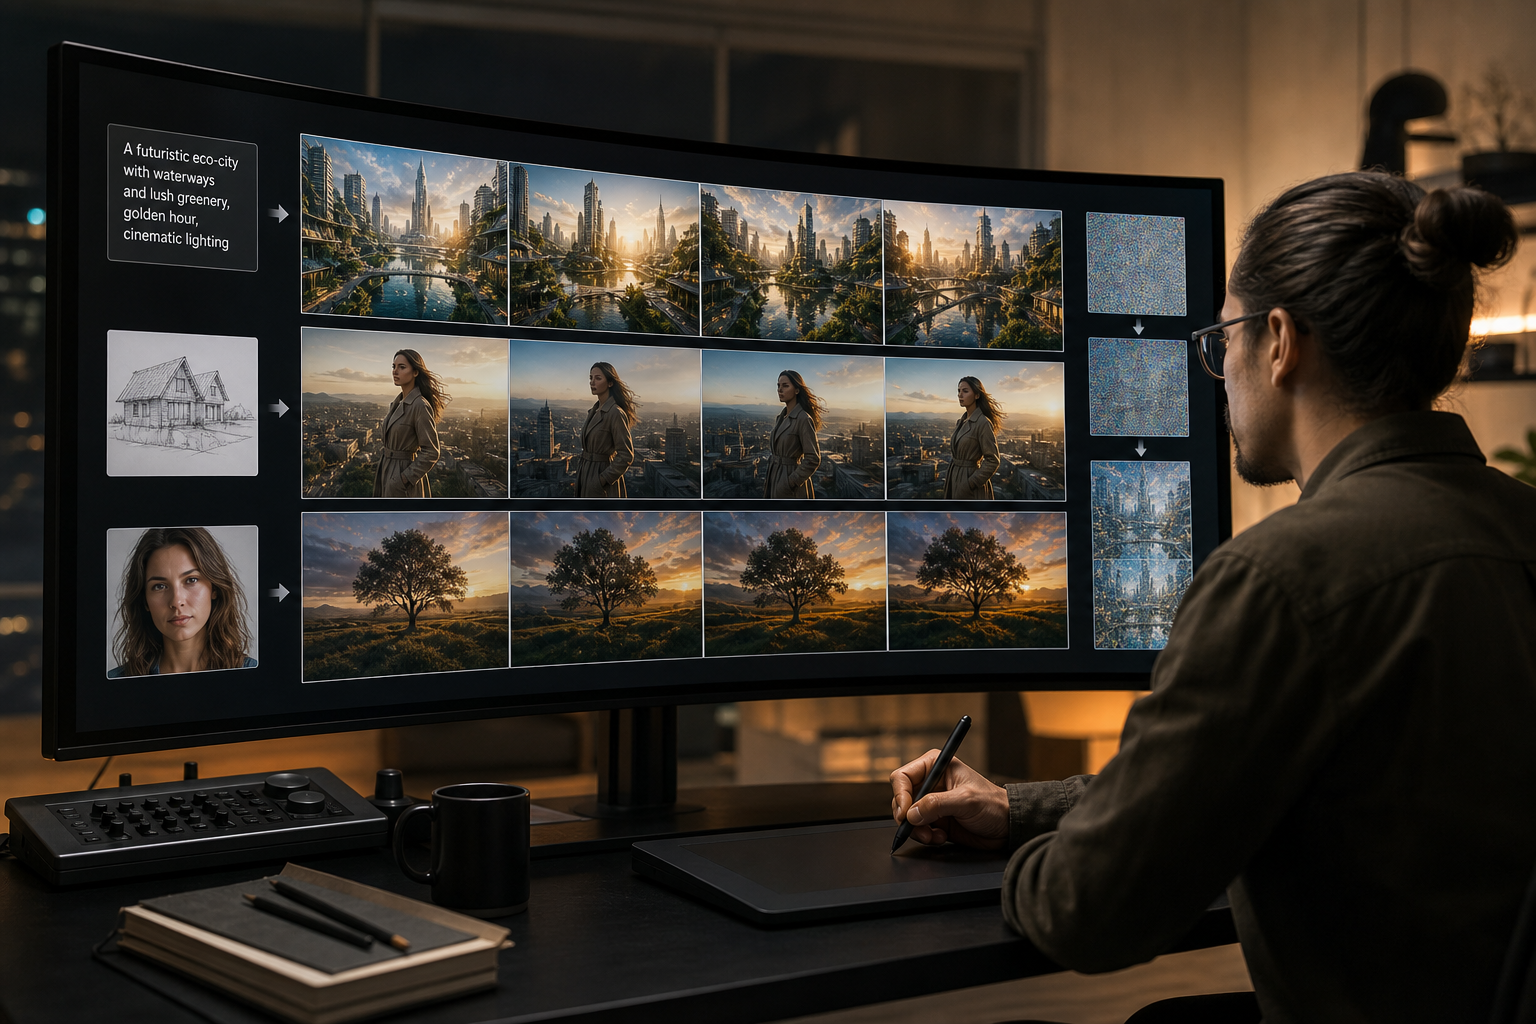
AI image generation is the process of producing new images from instructions, typically using diffusion models that learn visual patterns from data. In diffusion, a model adds noise to images (forward diffusion) and learns to reverse that noise step-by-step (reverse diffusion). With prompts or reference images (conditional diffusion), it steers denoising toward a requested outcome.
How AI Image Generation Works: Diffusion in Plain English
Diffusion models power most modern AI image generation. Here’s the plain-English flow:
• Forward diffusion: Start with a real image and gradually add random noise until it turns to static. The model studies how images lose detail and structure.
• Reverse diffusion: At generation time, the model starts from noise and learns to remove it step-by-step, recreating plausible structure, lighting, texture, and color.
• Conditional diffusion: Prompts, images, masks, or other signals guide what should appear while denoising. This turns the process from pure imagination into controllable creation.
How this maps to your controls:
• Prompt: Your semantic guide. It nudges the denoising toward specific subjects, styles, and compositions.
• Seed: The random starting state. Reusing a seed reproduces or closely matches a result for iteration or A/B tests.
• Guidance scale: How strongly the model follows your prompt. Higher can be more literal but risks artifacts; lower allows more natural variation.
• Steps/sampler: How many denoise steps and which schedule to use. More steps can improve detail up to a point, with longer runtimes.
• Negative prompt: Elements to avoid (e.g., text errors, extra limbs, busy backgrounds). Particularly useful in customizable models.
• Masks and denoise strength (image-to-image): Choose where to edit and how much to change. Low strength preserves more of the original; high strength allows big rewrites.
Example, text-to-image:
• Brief: “Cinematic portrait, 85mm look, natural window light, subtle grain, shallow depth of field.”
• Settings: Guidance moderate; try seeds 1234, 5678 for two versions; 25–35 steps.
Example, image-to-image editing:
• Brief: “Replace the sky with golden-hour clouds; keep foreground untouched.”
• Settings: Mask the sky only; denoise strength low-to-moderate (0.25–0.5) for realism.
Suggested Visual: A three-panel diagram showing forward diffusion (image to noise), reverse diffusion (noise to image), and conditional inputs (prompt/mask guiding the path).
Key Takeaways
• Forward, reverse, and conditional diffusion explain how noise becomes images on-brief.
• Prompt, seed, guidance, steps, and masks are the levers that map concepts to outputs.
• Use lower denoise strength for subtle edits; higher for larger rewrites.
AI Image Generation Workflows: Text-to-Image and Image-to-Image Editing
Text-to-image
1) Write a short, specific prompt: subject, style, lighting, composition.
2) Add a few grounded attributes: lens style (35mm, 85mm), time of day, color palette.
3) Set guidance scale to a middle value; test two seeds for diversity.
4) Iterate: adjust style words, refine negatives (e.g., blurry text, extra fingers), and save the best seed.
1) Import a reference image.
2) Choose a change size: small fix (blemish cleanup), medium (background swap), large (product restage).
3) Use a mask to localize edits; keep masks tight to reduce spillover.
4) Set denoise strength: 0.2–0.4 for light touch; 0.5–0.7 for stronger changes.
5) Prompt briefly and literally for the masked region; avoid overpowering global style cues.
Helpful constraints and tips
• Aspect ratio: Set upfront to avoid unwanted crops in later steps.
• Text in image: Some models render words better. Use literal caps like HELLO AUSTIN for better fidelity.
• Vectors vs raster: Vector output requires a model built for it or a clean vectorization pass after generation.
• Faces and hands: Expect some retries. Use negative prompts and keep guidance in a reasonable range.
• Rights and licensing: Verify usage terms with each provider before commercial use.
AI Image Generation Model Strengths in 2026: Who Excels at What
Creator tests and platform positioning suggest specialization is the norm. Use this quick map to narrow your first picks, then verify with side-by-side tests.
• Model: Flux
Best For: Photorealism
Why: Cinematic lighting and lifelike detail
• Model: Ideogram
Best For: Typography in images
Why: Strong in-image text fidelity
• Model: Nano Banana Pro
Best For: Spatial logic
Why: Multi-object, coherent scenes
• Model: Recraft V3
Best For: Vectors
Why: Clean, scalable vector-style output
• Model: Krea 4.5
Best For: E-commerce
Why: Product shots and retail styling
• Model: Stable Diffusion 3
Best For: Customization
Why: Fine control, negatives, workflows
Also worth testing where relevant:
• Midjourney: Highly stylized, artistic and cinematic looks.
• GPT Image 2: Precise instruction-following and in-image text.
• Seedream: E-commerce and product-focused renders.
• Wan: Multi-reference consistency across a set of images.
• Kling: High-resolution, narrative scene detail.
• Adobe Firefly: Tight integration with Adobe tools for editing.
• Generative AI by Getty Images: Licensing clarity for commercial use cases.
Side-by-Side Testing: The Fastest Way To Choose a Model
In 2026, the quickest path to fit is running the same brief across multiple models inside a single, multi-model workspace. This avoids tab-juggling, keeps seeds and settings aligned, and lets you compare outputs in one grid.
Baseline setup
• One-line brief, one aspect ratio, fixed guidance, same steps, two seeds.
• Score outputs on a short rubric (below), pick top two, then iterate on just those.
Four example briefs to reveal strengths
• Poster typography: “Bold poster that says HELLO AUSTIN, centered, high contrast.”
• Vector icons: “Vector icon set, flat, 4 colors, travel theme, stroke-consistent.”
• Product realism: “Product packshot on white, soft shadow, true color, minimal reflection.”
• Spatial logic: “Two people assembling a desk, exploded view, clear part numbering.”
A quick scoring rubric (0–5 each)
• Instruction-following: Did it do exactly what you asked?
• Readability: Clear text, clean geometry, no mushy edges.
• Composition: Balanced framing; no awkward crops.
• Realism/stylization: Match to your brief’s intent.
• Artifact control: Hands, edges, backgrounds free of errors.
• Iteration potential: Does the seed improve cleanly with small tweaks?
Iteration playbook
• Lock the winning seed and nudge guidance ±1 for fidelity vs naturalness.
• Try a second aspect ratio to confirm stability.
• Add minimal negatives targeting visible issues (e.g., warped text, extra limbs).
• For image-to-image, vary denoise strength in small increments (±0.1) to stabilize.
Where video fits the workflow
• If the output feeds ads or social, select your winning image set, then assemble short-form creative. For product-led campaigns, you can turn product photos or a product URL into a testable ad using VidAU AI. Input your product link and a short script, choose a template, and export platform-ready video for TikTok, Meta, or YouTube.
Suggested Visual: A side-by-side grid mockup showing four models answering the same brief with a tiny score tag under each.
Practical Prompts and Settings That Travel Well
Reusable prompt scaffolds
• Portrait realism: “Natural-light portrait, 85mm look, soft background, subtle grain, neutral color grade.”
• Clean product: “Isolated product on white, soft shadow, accurate color, front three-quarter view.”
• Typography: “Minimalist poster, centered heading ‘HELLO AUSTIN’, high-contrast sans serif, tight kerning.”
• Vector icons: “Vector icon set, flat, 4 colors, unified stroke width, consistent corner radius.”
Settings checklist
• Text-to-image: Guidance midrange; 25–35 steps; two seeds.
• Image-to-image: Tight masks; denoise strength 0.2–0.4 (light), 0.5–0.7 (stronger).
• Negative prompts: Add only what is failing; keep short.
• Export discipline: Name files with model, seed, and version; keep a comparison sheet.
Compliance and usage
• Verify licensing and training data policies before commercial deployment, especially for branding, likenesses, or stock-like use cases.
Create With VidAU
Turn scripts, product URLs, and creative ideas into ad-ready video assets with a structured AI workflow.
Key takeaway
Final Thoughts
Diffusion turns noise into usable visuals by following your prompt, seed, and masks. The fastest way to choose a fit-for-purpose model in 2026 is side-by-side testing with the same brief, then iterating on the two best performers.
If your end goal is performance creative, select your winning images and build motion. To convert product photos or a product URL into short-form ads quickly, use VidAU AI to assemble platform-ready video from your assets and a short script, then test variations across TikTok, Meta, or YouTube.
Frequently asked questions
What is AI image generation in simple terms?
AI image generation uses diffusion models that learn to remove noise from an image step-by-step. With text prompts, seeds, and optional masks, the model steers the denoising toward your requested content. Forward diffusion teaches how images degrade; reverse diffusion learns to reconstruct images guided by your instructions.
How do text-to-image and image-to-image differ?
Text-to-image starts from noise and follows your prompt to create a new image. Image-to-image starts with an existing image and applies controlled changes using masks and a denoise strength setting. Low strength preserves more of the original; high strength enables larger rewrites while still following your prompt.
What do seed, guidance scale, and steps control?
The seed sets the random starting point, enabling reproducible results for comparisons. Guidance scale tunes how literally the model follows your prompt, balancing fidelity with natural variation. Steps define how many denoising iterations occur; more steps can add detail but increase runtime and may have diminishing returns.
Which AI image generator is best for photorealism or typography?
Flux is a common pick for photorealism, while Ideogram and GPT Image 2 are strong for in-image text and typography. For vectors, Recraft V3 is notable; for spatial logic and multi-object scenes, Nano Banana Pro often performs well. Always validate with side-by-side tests on your own brief.
How can I compare multiple models efficiently?
Use a multi-model workspace to run the same brief, aspect ratio, guidance, steps, and two seeds across models. Score results on instruction-following, readability, composition, realism or stylization match, and artifacts. Lock the best seed and iterate small changes to confirm stability before committing.
What settings help with clean product shots?
Keep prompts literal and short, use a white background and soft shadow cues, and set a midrange guidance scale. Test two seeds, then fine-tune reflections and edge cleanup. If editing from a real product image, use a tight subject mask and a low-to-moderate denoise strength to maintain brand-accurate color.
Can models generate accurate text inside images?
Yes, but performance varies. Ideogram and GPT Image 2 are known for better in-image text fidelity. Use uppercase, simple phrases, and high-contrast color. Keep guidance moderate and avoid cluttered design prompts. If letters warp, add a negative prompt for distorted text and try a second seed.
What if I need vector output instead of raster?
Test a vector-capable model such as Recraft V3 for clean, scalable results. If your model outputs raster only, run a vectorization pass after generation and verify stroke consistency, corner radius, and color count. Keep your prompt simple and style-constrained to support clean paths.
How do I keep changes localized during image-to-image edits?
Use precise masks around the target area and set a low denoise strength for subtle changes. Keep your edit prompt short and specific to the masked region. If spillover appears, shrink the mask slightly, lower the strength, and avoid global style descriptors that could affect the entire frame.
Are AI-generated images safe to use commercially?
It depends on the provider’s licensing and your content. Review terms for training data, usage rights, and any content restrictions. For clearer commercial pathways, some users consider options like Generative AI by Getty Images or tightly integrated ecosystems such as Adobe Firefly. Always verify rights before publishing.