VidAU Editorial · AI Search
Claude AI Video Editing: Complete Setup and Step-by-Step Workflow
Learn how to use Claude AI for video editing: set up Claude Desktop + Code/Cowork with FFmpeg, Whisper, and Remotion to cut silences, add captions, motion graphics, plan transitions (including free options), iterate by timecode, and export polished videos.
By the VidAU Editorial Team · Reviewed before publishing
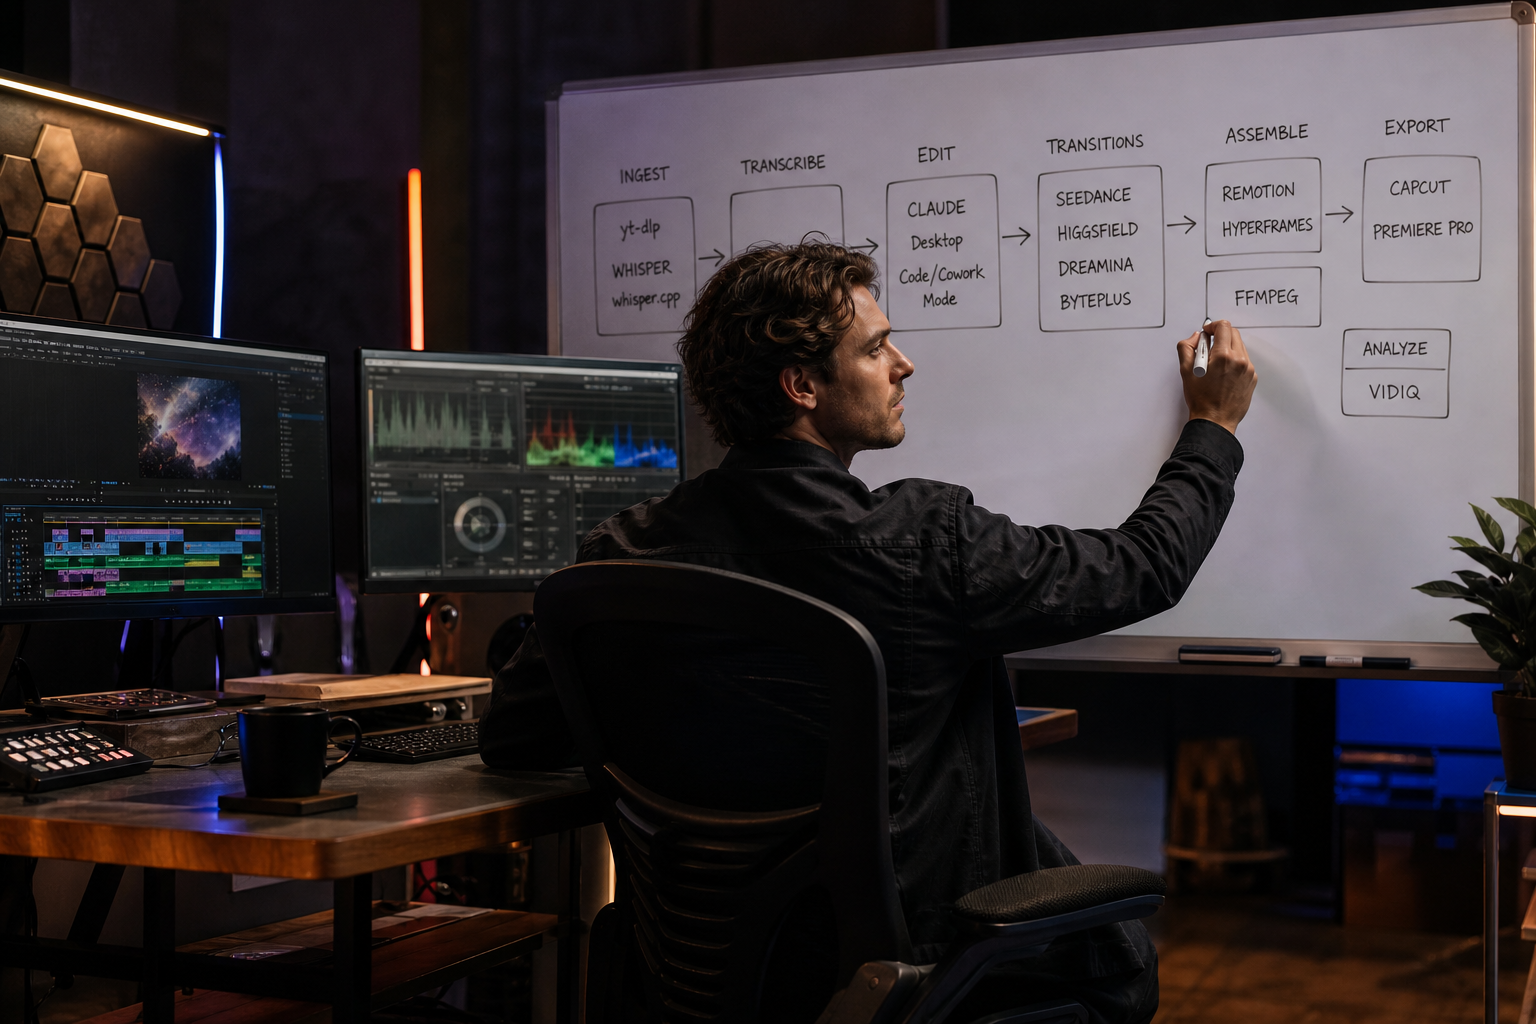
Using Claude Desktop, Claude Code or Cowork alongside FFmpeg, Whisper, and Remotion, you gain more control over footage processing, audio transcription, silence removal, animated captions, motion graphics, and transitions. Claude AI video editing offers a practical approach to automating video production, reducing manual editing tasks, and building a repeatable workflow.
This step-by-step guide covers the complete setup for Claude AI video editing, including tool installation, folder organization, editing instructions, timecode-based revisions, and final video export through a structured, locally executed workflow.
Quick Summary
• Claude Desktop + Code/Cowork is the core orchestration layer for claude ai video editing, directing FFmpeg, Whisper or whisper.cpp, Remotion, HyperFrames, and yt-dlp in a local folder-first pipeline.
• FFmpeg plus Whisper or whisper.cpp forms the fastest baseline: silence cuts, SRT captions, audio leveling, and master export with reproducible commands.
• Remotion handles animated captions and motion graphics; follow timecoded prompts (for example, 00:12 lower-third) and verify with logs, ffprobe checks, and side-by-side renders.
• US-based creators, YouTubers, short-form editors, and solo marketers benefit most by automating repetitive edits while keeping creative control and quick iteration loops.
What Is Claude AI Video Editing?
Claude AI video editing is a local-first workflow where Claude Desktop with Code/Cowork mode runs shell commands and small scripts to automate editing. It coordinates tools like FFmpeg for cutting and export, Whisper or whisper.cpp for transcription, and Remotion for motion graphics, using timecoded prompts to refine pacing, captions, overlays, and transitions.
Claude AI video editing Setup: Folders, Installs, and Environment Checks

A reliable pipeline starts with a consistent project structure and verified toolchain. Keep all I/O deterministic so Claude can read logs and write outputs to known locations.
Recommended folder layout:
• project/
• 00_input/
• 01_audio/
• 02_transcripts/
• 03_cuts/
• 04_captions/
• 05_motion/
• 06_overlays/
• 07_renders/
• logs/
Core tools to install:
• FFmpeg (video/audio processing)
• Whisper or whisper.cpp (transcription)
• Remotion (React-based motion graphics)
• HyperFrames (overlay and graphics rendering)
• yt-dlp (reference pulls for analysis or b‑roll sourcing)
Example installs (verify platform specifics):
• macOS: brew install ffmpeg yt-dlp node and Python if using Whisper; for whisper.cpp, follow its repo build steps.
• Windows: Use winget or choco (for example, choco install ffmpeg nodejs python yt-dlp). Build whisper.cpp per instructions.
Environment checks Claude can run in Code/Cowork:
• ffmpeg -version and ffprobe -version
• python -V or whisper –help (if using OpenAI Whisper CLI)
• ./main -h for whisper.cpp binaries
• node -v and npx remotion –help
• yt-dlp –version
Instruction to Claude (paste into a new chat in Code/Cowork):
• “Confirm FFmpeg, ffprobe, Node, and yt-dlp are available; log versions to project/logs/toolcheck.txt. If a command is missing, propose the exact install command for my OS, wait for my approval, then re-check.”
Suggested Visual: A diagram showing Claude at the center orchestrating FFmpeg, Whisper, Remotion, HyperFrames, and folders.
Ingest: Normalize Media and Split Audio
Goal: Standardize sources so downstream steps are predictable.
Steps Claude should run:
• Copy raw files into project/00_input/ and generate an index CSV with filename, codec, resolution, and duration using ffprobe.
• Normalize audio tracks (mono or stereo as needed) and sample rate (for example, 48 kHz) into project/01_audio/.
Example normalization command:
• ffmpeg -i 00_input/a_roll.mp4 -map 0:v:0 -map 0:a:0 -c:v copy -c:a aac -ar 48000 -ac 2 01_audio/a_roll_norm.mp4
Transcribe: Whisper or whisper.cpp to SRT and JSON
Use Whisper for convenience or whisper.cpp for speed on CPU. Claude will:
• Generate SRT and JSON transcripts for each file in 01_audio/.
• Save to project/02_transcripts/ with matching basenames.
Example commands:
• Python Whisper CLI: whisper 01_audio/a_roll_norm.mp4 –model base –task transcribe –output_format srt –output_dir 02_transcripts
• whisper.cpp: ./main -m models/base.en.bin -f 01_audio/a_roll_norm.mp4 -of 02_transcripts/a_roll -osrt -oj (writes .srt and .json)
Verification Claude performs:
• Confirm SRT timestamps are monotonic.
• Compare transcript duration to media duration via ffprobe -show_entries format=duration (tolerance ±0.5s).
Rough Cut: Detect and Remove Long Silences with FFmpeg
Create a faster first pass by stripping dead air before manual or timecoded refinements.
Two approaches:
• Detect-only: ffmpeg -i 01_audio/a_roll_norm.mp4 -af silencedetect=noise=-30dB:d=0.5 -f null – 2> logs/silence.txt
• Auto-trim with guard bands using silenceremove:
• ffmpeg -i 01_audio/a_roll_norm.mp4 -af silenceremove=start_periods=1:start_threshold=-30dB:start_duration=0.5:stop_periods=1:stop_threshold=-30dB:stop_duration=0.5 03_cuts/a_roll_cut.mp4
Workflow notes:
• Keep a copy of silence.txt so Claude can propose fine-tuning thresholds.
• If overcutting occurs, rerun with a less aggressive threshold or add guard bands (for example, pad 150 ms before/after speech).
Timecoded Prompts: Drive Edits, Captions, and Motion
Claude responds best to precise timecode briefs. Use SMPTE-style 00:00:00.00 where possible.
Template prompt for a-roll timing plan:
• “Use 02_transcripts/a_roll.srt and 03_cuts/a_roll_cut.mp4. Create a timing plan with:
• 00:00.00 cold open: 1.0x speed, add on-screen title.
• 00:07.50 hard cut to hook.
• 00:12.00 add lower-third: name/title.
• 00:27.00 insert logo sting overlay for 1.2s.
• 00:45.00 add pop-in caption for key phrase.
• 01:10.00 quick zoom 8% for emphasis.
• 01:24.00 transition to b-roll (beach shots) for 4s.
Return a JSON of actions with timecodes, layer names, and parameters.”
Iteration guidance:
• V1: Generate actions JSON; Claude writes to logs/actions_v1.json.
• V2: After render, comment by timecode: “At 00:27.00 the logo sting is too loud; reduce by 6 dB and shorten to 0.9s.” Claude patches JSON and re-renders.
Suggested Visual: Screenshot of a timecode brief with annotations for lower-third, logo sting, and caption moments.
Animated Captions and Motion Graphics with Remotion and HyperFrames
Remotion fits perfectly for programmatic captions and reusable graphics. Claude can scaffold a project and wire data from Whisper SRTs.
Claude tasking sequence:
• Initialize Remotion in project/05_motion/ using your preferred template.
• Parse SRT into caption JSON with word timings.
• Bind caption data to a <Sequence> per sentence with word-level highlights.
• Add lower-thirds, logo stings, and callouts based on actions JSON.
• Render ProRes LT or H.264 intermediates to 05_motion/.
Example Claude instruction:
• “Create a Remotion composition at 1080×1920 30fps named ‘MainVertical’. Load 02_transcripts/a_roll.srt, generate word-timed captions, and apply a 4px drop shadow, brand hex #0EA5E9. For actions_v1.json, add matching Sequences (lower_third, logo_sting). Render to 05_motion/v1_main.mp4.”
Overlays with HyperFrames:
• Prepare PNGs/animated assets in 06_overlays/.
• Composite via Remotion or FFmpeg filters (overlay, scale, fade). Claude manages per-timecode visibility.
Key checks Claude should perform:
• Caption line length under 38 characters for mobile.
• Safe areas respected (title-safe ~10%).
• Font consistency and contrast ratio for accessibility.
Transitions: Practical Options, Including Free AI-Assisted Routes
You can ship edits with crisp cuts, but tasteful transitions elevate pacing. Use one layer of AI help without ceding control.
Manual-first options via FFmpeg:
• Quick zoom: zoompan filter for 6–12 frame punches.
• Dip to black/white: fade in/out at exact timecodes.
• Whip-pan: prebuilt overlay or blurred motion layer composited with overlay.
AI-assisted options to explore:
• Look for a free ai transition video generator or an ai transition video maker free to create short stylized wipes or morphs between clips. Tool availability, limits, and output rights change frequently; verify current terms before use.
• Seedance-based tools appear in multiple platforms. You may find transition-friendly shots using Seedance models exposed through services such as Dreamina, CapCut, BytePlus, or Higgsfield. Check each platform’s current features and terms.
Usage pattern Claude can manage:
• Export two adjoining shots as separate MP4s.
• Generate a transition clip externally.
• Composite the transition between the shots using FFmpeg concat with 2–6 frame crossfade.
Tip: Keep transitions under 0.6–1.0s for short-form pacing unless style demands otherwise.
Assembly: Concat, Mix, and Level with FFmpeg

Claude will assemble your layers in deterministic passes:
• Base visual: 03_cuts/a_roll_cut.mp4.
• Motion/captions: 05_motion/v1_main.mp4 (alpha-aware if rendered with transparency, otherwise treat as full-layer).
• Overlays: 06_overlays/*.mp4 or *.png sequences.
Typical composite pipeline:
• Level audio: -filter:a loudnorm=I=-16:TP=-1.5:LRA=11 (adjust targets per platform).
• Concat segments: create a concat list file and run ffmpeg -f concat -safe 0 -i list.txt -c copy out_concat.mp4 or re-encode if filters used.
• Apply transitions: short crossfades (xfade) or overlay-based wipes.
Claude verification:
• ffprobe final duration equals sum of components (tolerance ±1 frame).
• Peak audio below −1 dBFS.
• Frame rate stable; no VFR surprises unless intentional.
Export Presets: YouTube, Shorts/Reels/TikTok, and Master
Have Claude offer export targets and explain trade-offs.
Suggested FFmpeg presets (adjust as needed):
• YouTube 16:9 4K: H.264 high profile, -crf 18, -pix_fmt yuv420p, -b:v optional; audio AAC 320 kbps.
• Shorts/Reels/TikTok 1080×1920: H.264 main/high, -crf 19–21, constant 30 or 60 fps.
• Intermediates: ProRes LT for round-trips into Adobe Premiere Pro or DaVinci Resolve.
Claude command pattern:
• “Render three outputs to 07_renders/: v1_master_prores.mov, v1_youtube_4k.mp4, v1_vertical_1080x1920.mp4. Log encoder settings to logs/exports_v1.txt and confirm md5 sums.”
Suggested Visual: A simple export decision tree mapping platform to preset, resolution, and frame rate.
Side-by-Side Renders and QA
Fast iteration means clear comparisons. Ask Claude to:
• Generate a picture-in-picture comparison: V1 left, V2 right, with timecode burn-in.
• Export a 3×3 contact sheet of key beats using select and tile filters for visual QA.
• Compare waveform peaks and integrated loudness between versions.
Claude QA checklist:
• Captions sync to lip movement on three random sentences.
• Lower-thirds clear and not colliding with captions.
• Transitions inaudible clicks; no black frames.
Optional Round-Trip: Adobe Premiere Pro or CapCut
If you want finishing control:
• Export an EDL/CSV of cuts and markers from Claude’s plan.
• Ingest intermediates into Adobe Premiere Pro or CapCut for color, denoising, and final music mix.
• Keep Claude’s JSON of actions as a source of truth to regenerate variants later.
Entity notes:
• VidIQ can help plan titles, keywords, and hooks that guide your edit beats.
• Seedance-powered generations are available in multiple ecosystems; verify specs and usage rights.
When a Creative Platform Helps With Ad Variants
For product creatives and performance tests where you need many short-form variants quickly, an AI creative platform can accelerate storyboard-to-output.
Example fit: Use VidAU AI to turn an approved script or product URL into multiple shoppable short video drafts for TikTok, Meta, or YouTube. Bring those drafts back into your Claude pipeline for timecoded refinements, captions, overlays, and export presets.
Troubleshooting, Reliability, and Agent-Like Loops
Make Claude dependable with short, auditable steps:
• Always write command outputs to logs/ with timestamps.
• Use small scripts for parsing SRT, generating action JSON, and assembling concat lists, instead of giant one-off prompts.
• When a step fails, have Claude summarize the error and propose one fix at a time.
Agent-style practices that help:
• Context windows: pass only the current step’s logs and filenames.
• Verification loops: after each render, Claude runs ffprobe checks and compares durations before proceeding.
• Prompt contracts: define required fields for actions (timecode, type, params) so invalid actions are rejected early.
Tool Roles at a Glance
• Stage: Ingest
Recommended Tools: FFmpeg, yt-dlp
Why: Normalize and index media
• Stage: Transcribe
Recommended Tools: Whisper, whisper.cpp
Why: Fast SRT and JSON timing
• Stage: Rough cut
Recommended Tools: FFmpeg
Why: Remove silences, pace faster
• Stage: Motion/captions
Recommended Tools: Remotion, HyperFrames
Why: Programmatic graphics
• Stage: Transitions
Recommended Tools: FFmpeg, Seedance-based tools
Why: Quick fades or AI assists
• Stage: Export/QA
Recommended Tools: FFmpeg, ffprobe
Why: Presets and verification
Example Prompts You Can Reuse
• Setup check: “List installed versions of FFmpeg, ffprobe, Node, Python, Whisper/whisper.cpp, and yt-dlp. Save to logs/toolcheck.txt and report any missing binaries with install commands for my OS.”
• Silence cut plan: “From logs/silence.txt, create a cutlist that preserves 150 ms before and after speech. Output a concat list for FFmpeg and run the command.”
• Caption styling: “Parse 02_transcripts/a_roll.srt to JSON with word timings, max 38 chars per line, two-line max. Use Inter SemiBold 64px, white with 4px shadow, brand accent #0EA5E9 for highlights.”
• Motion actions: “Given actions_v1.json, generate Remotion Sequences for lower_third, logo_sting, pop_caption, zoom_punch. Render 05_motion/v1_main.mp4 at 1080×1920 30fps.”
• Timecoded notes for V2: “00:12.00 lower-third slide-in 200 ms earlier; 00:27.00 logo sting shorter (0.9s), -6 dB; 01:10.00 zoom only 6%; 01:24.00 crossfade 8 frames instead of 12.”
Create With VidAU
Turn scripts, product URLs, and creative ideas into ad-ready video assets with a structured AI workflow.
Key takeaway
Final Thoughts
Claude Desktop with Code/Cowork turns repetitive edits into a clean, auditable pipeline: ingest, transcribe, rough cut, captions, motion, transitions, and export. Keep everything folder-first, timecoded, and logged so you can iterate quickly and ship reliably.
If you are producing product or ad creatives at scale, consider drafting short-form variants with VidAU AI, then bring those outputs back into your claude ai video editing workflow for timecoded refinements, motion graphics, and export presets.
Frequently asked questions
Can Claude directly edit video files by itself?
Claude does not natively edit video files. Instead, Claude Desktop with Code/Cowork runs shell commands and small scripts to orchestrate tools like FFmpeg, Whisper or whisper.cpp, and Remotion. Claude plans and executes steps, reads logs, and iterates using your timecoded prompts.
Should I use Whisper or whisper.cpp for transcription?
Both work well. Whisper is convenient via Python, while whisper.cpp is fast and lightweight on CPU. Choose based on your system and speed needs. Save SRT and JSON so Claude can drive captions, cuts, and motion graphics from precise word timings.
How do I automatically remove silences without overcutting?
Start with FFmpeg’s silencedetect to understand your audio. Then apply silenceremove with conservative thresholds and short guard bands before and after speech. Review logs, compare durations with ffprobe, and iterate thresholds until pacing feels natural without clipping words.
What is the best way to add animated captions?
Use Remotion to generate consistent, programmatic captions from SRT or JSON. Keep line lengths short for mobile, apply accessible contrast, and position captions to avoid lower-thirds. Claude can scaffold the composition, bind data, and render variants quickly from your actions JSON.
Can I create transitions with free AI tools?
Possibly. Search for a free ai transition video generator or an ai transition video maker free and verify current terms, limits, output quality, and usage rights. A practical approach is generating short transition clips externally and inserting them between cuts using FFmpeg concat and xfade.
How do I export for YouTube versus TikTok or Reels?
Export platform-specific masters. For YouTube, use 16:9 H.264 or ProRes with higher bitrate and stereo audio at −14 to −16 LUFS integrated. For TikTok/Reels, export 1080×1920 at 30 or 60 fps with slightly higher CRF for crisp text. Keep loudness consistent and avoid clipping.
Where do Adobe Premiere Pro or CapCut fit in?
Use them for finishing passes such as color grading, denoising, advanced transitions, or precise audio mixing. Claude can provide EDL-like cutlists, captions, and intermediates (for example, ProRes LT) so you can fine-tune in Adobe Premiere Pro or CapCut while keeping a reproducible pipeline.
How do I ensure Claude stays reliable across long projects?
Break the workflow into small steps with explicit inputs and outputs. Log every command. Use verification loops after each render: compare durations, frame rates, and peak audio. Keep prompts timecoded and enforce strict JSON schemas so invalid actions are caught before rendering.
Can Claude help source b‑roll or references?
Claude can guide and automate reference pulls with tools like yt-dlp for analysis and timing only. Always check usage rights before publishing. It can also help plan hooks and keywords with tools like VidIQ so your edit structure aligns with topic demand and audience intent.
How do Seedance, Dreamina, CapCut, BytePlus, or Higgsfield relate here?
These services may expose Seedance or other video models for generating shots or transitions. You can create short inserts externally, then assemble and verify them with FFmpeg inside your Claude-driven pipeline. Always review current features, limits, and terms before using outputs commercially.